Ask any seasoned contractor who has ever had to rip out a brand-new vanity, and they will tell you the exact same thing: do not buy a single box of tile until you know exactly where your toilet is going.
Bathrooms are uniquely unforgiving spaces. They are tight, notoriously expensive per square foot, and literally bolted to the floor. You can’t just slide a cabinet over a few inches at the tail end of a project because the drawers happen to hit the door frame. The plumbing rough-ins dictate your life. If the layout isn’t completely bulletproof on paper before someone picks up a sledgehammer, you are in for a very expensive headache.
Designing a functional bathroom floor plan is rarely about picking out pretty finishes. It’s about movement flow, human ergonomics, and a strict adherence to spatial clearances.
Here is exactly how to get the math right the first time.
Why You Can’t Just “Eyeball” a Bathroom Floor Plan
The difference between a bathroom that feels like a custom luxury spa and one that feels like a cramped closet almost always comes down to a matter of inches.
Professional designers don’t guess. They rely on strict guidelines established by the National Kitchen and Bath Association (NKBA) alongside local building codes. Before you commit to moving a drain pipe or framing a wall, you need to measure your intended layout against these heavy-hitting industry standards.
1. Toilet Spacing and Clearances
Nobody likes feeling boxed in while using the toilet. This is usually the first place DIY remodelers mess up.
The Minimum Rule: You need an absolute minimum of 15 inches from the center of the toilet flange to any side wall, vanity cabinet, or glass shower enclosure.
The Comfort Rule: If you actually have the square footage, bump that out to 18 inches from the centerline.
Front Clearance: You also need at least 21 inches of clear, unobstructed floor space directly in front of the toilet bowl. (Though 30 inches is highly recommended).
2. Shower Dimensions That Actually Work
Building codes in many municipalities will technically allow you to install a 30″ x 30″ shower. Don’t do it. Have you ever tried washing your hair in a 30-inch box? It’s miserable.
- The NKBA Recommendation: Aim for an interior footprint of at least 36″ x 36″. This gives you enough physical room to bend over without slamming your elbows into the glass or the tile wall.
- Door Swings: If you are using a hinged glass shower door, building code mandates that it must swing outward into the bathroom (in case someone falls inside and blocks the door). Ensure you have enough clearance so it doesn’t hit the vanity.
3. The Truth About Double Vanities
Homeowners are obsessed with double vanities for resale value, but trying to squeeze two sinks into a tiny cabinet is a massive mistake.
- The Minimum Width: A genuinely functional double vanity requires a minimum width of 60 inches.
- The Reality: Anything smaller than 60 inches means two people will be constantly bumping elbows while brushing their teeth, and you’ll have virtually zero usable counter space. If you only have 48 inches to work with, install a single sink with miles of glorious counter space instead.
4. Door Swings and Traffic Flow
A standard interior bathroom door needs about 32 inches of clearance to swing fully open. If your door hits the vanity counter or clips the edge of the toilet, you have two choices:
- Reframe the wall for a space-saving pocket door.
- Change the door hinges so it swings outward into the hallway.
Beyond the Tape Measure: Electrical & Ventilation
When planning your comprehensive layout, don’t forget the invisible elements.
Electrical (GFCI): Code requires at least one GFCI-protected electrical outlet within 36 inches of the outside edge of the sink. Don’t place your vanity in a spot where you can’t run wiring.
Ventilation: Even if you have an operable window, modern code usually demands a mechanical exhaust fan to prevent mold. Make sure your layout allows for ceiling space to vent outside.
The Smart Shortcut: Let AI Visualize the Big Picture First
Drawing your floor plan to scale on graph paper is tedious. Staring at an empty room trying to visualize where the shower should go can leave you paralyzed with indecision.
The smartest, most efficient shortcut for homeowners and contractors today is leveraging AI to generate your “big picture” layout before you start sweating the micro-measurements.
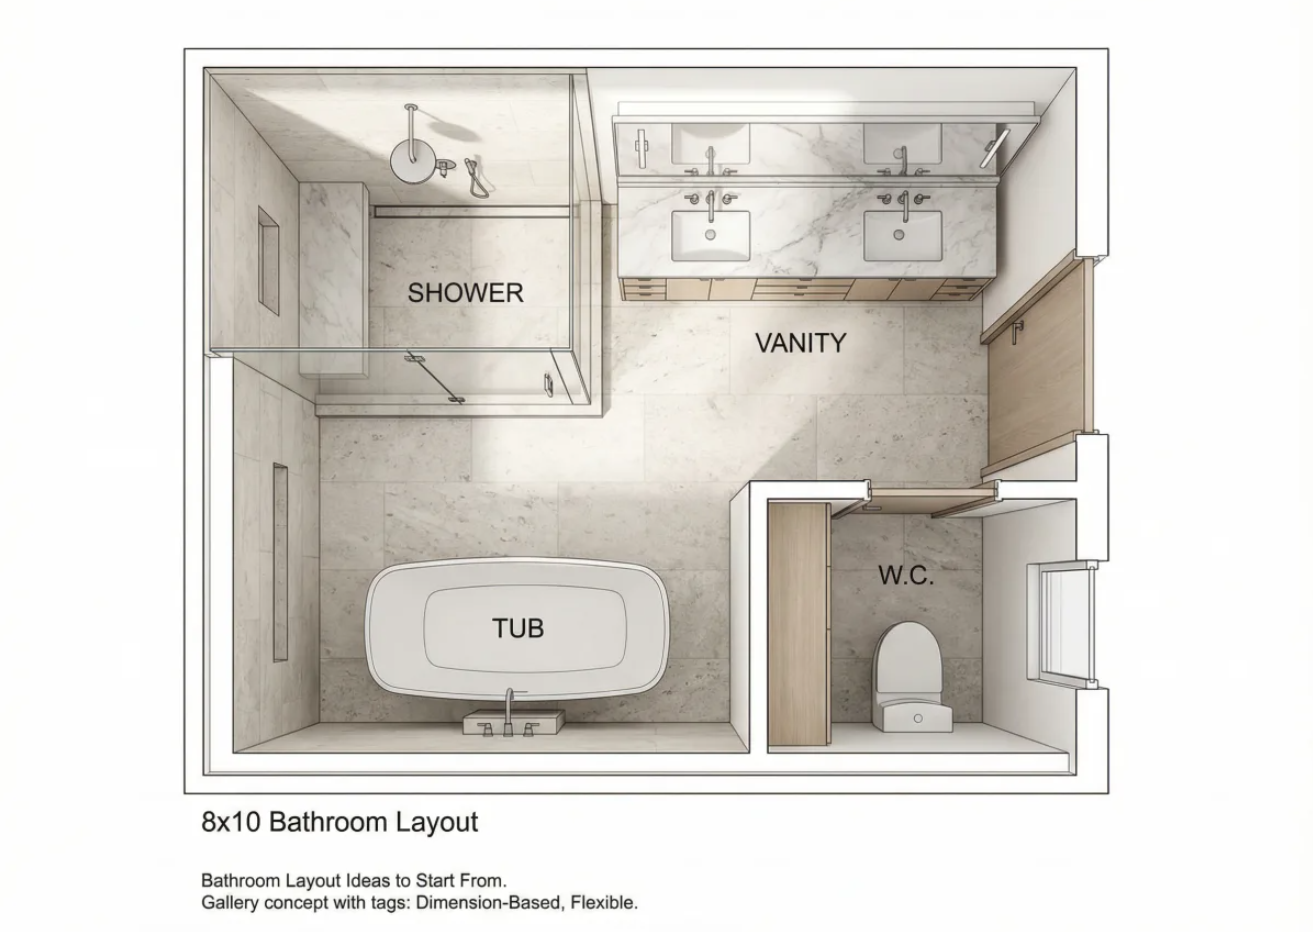
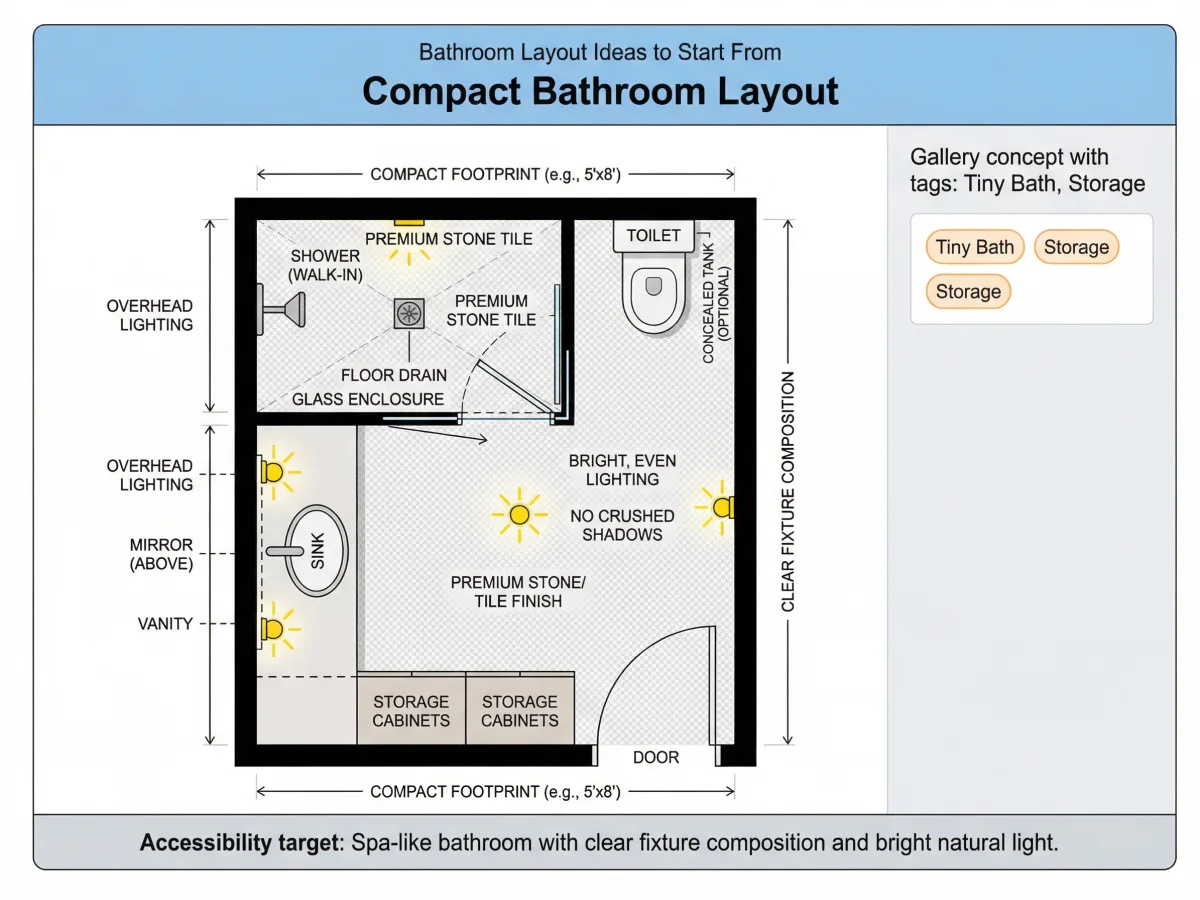
Instead of guessing, run your general dimensions through the AI floor plan generating tool at aiai.com. You simply input your overall room size (like a standard 5×8 or a spacious 8×10 footprint) and select the fixtures you want to include (tub, shower, vanity, toilet).
The AI does the heavy lifting of spatial arrangement. It instantly generates multiple layout variations, showing you exactly how the major elements flow best within your specific footprint. While you will still need to use your tape measure to verify the strict NKBA clearances later, the AI gives you a stunning, highly logical 2D or 3D visual foundation. It takes the terrifying guesswork out of deciding whether the shower belongs next to the door or across the room.
3 Golden Rules of Fixture Placement
Once the AI provides you with a beautiful layout foundation, grab your tape measure and keep these practical, “in-the-trenches” placement rules in mind:
1. Hide the Toilet
When you open the bathroom door, the first thing you see should be something beautiful—like a custom vanity mirror, a window, or your expensive shower tile. Try to tuck the toilet out of the direct line of sight. Put it behind the door swing, tucked next to the vanity, or hidden behind a half-wall (pony wall).
2. Check the Drawer Depths
A beautiful vanity is completely useless if it blocks foot traffic. You have to measure the depth of the vanity with the drawers fully pulled out. Make sure they don’t hit the shower curb, the toilet, or the opposite wall when you’re trying to grab a hairdryer.
3. Give Freestanding Tubs Breathing Room
Freestanding tubs look amazing on Instagram, but they require a massive amount of negative space. You need at least 4 to 6 inches of clearance on all sides of the tub. Why? Because you have to fit a mop back there to clean up dust and water splashes. If you don’t have that kind of clearance, an alcove tub is a much smarter, cleaner choice. Cramming a freestanding tub into a tight corner just looks like a measuring mistake.
The Bottom Line
Once the plumber finishes the rough-in and the concrete is poured, your layout is locked. Period.
Spend a few minutes running your room size through a tool like aiai.com to lock in a professional-grade visual floor plan before you hire out the labor. Combine that overarching AI vision with a tape measure to verify your final clearances, and it is quite literally the only way to guarantee your expensive new space will actually work.

Design unique Minecraft skins instantly with an AI Minecraft Skin Generator. Create custom skins from text prompts or images, customize Read more

Looking for the best AI image to image generator? Learn how to style transfer, turn photos into cartoons, and keep Read more

Introduction Creating realistic animated videos used to require advanced editing skills, motion design software, and hours of manual work. For Read more
Stop purchasing blindly! Use Nano Banana Pro's AI to generate realistic furniture previews. Learn precise prompt engineering to visualize colors, Read more